基本上是參考這篇, 但 Ubuntu 12.04 有些 package 名字己經改變
https://help.ubuntu.com/community/PXEInstallMultiDistro
安裝 Tftp 之後設定檔都不需要修改就可以直接使用, 這個套件是幫助 PXE boot 的過程中把開機檔傳送出去, ex: initrd.gz
安裝 dhcp server 是為了 PXE boot 過程中可以配置 ip 給 client, 一般就是和 Tftp server 裝在同一台, 但也有方式可以裝在不同台. 另外要注意一個網段內只能有一台 DHCP Server,不然就會打架. 在公司內設定的話, 我是給 Server 兩張網卡, 一張是用 Bridge 接到原來公司的網路, 就可以對外, 另一張用 internal network, 預計是在 intnet 提供 PXE boot 服務, 這樣就不會和公司的 DHCP server 衝突.
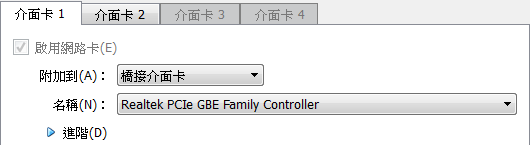
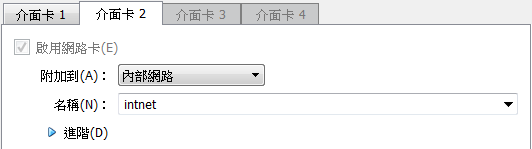
第一張網卡用 dhcp 拿到公司的 ip, 第二張我就設定成 192.168.100.1
在 Ubuntu 12.04, dhcp3 的名字改成 isc-dhcp-server
/etc/dhcp/dhcpd.conf 的內容
在 192.168.100.x 的網段提供 100~200, 並且設定開機檔為 "pxelinux.0"
設定好後記得重開
如果想要知道有沒有設定成功, 可以先拿一台已經裝好的機器, 加入第二張網卡, 也設定在 intnet, 開機後設定第二張網卡用 dhcp 拿 ip, 如果重啟網路有拿到 ip 就表示沒問題. 也可以看 Server 的 /var/log/syslog
安裝 boot loader
安裝 nfs, 是為了在網路開機成功後, 要抓取其它的檔案使用
在這裡我把 /srv/install 開放給 192.168.100.x 這個網段使用
準備安裝檔, 假設 Ubuntu 12.04 的光碟已經 mount 在 /mnt/cdrom
接下來要製作 boot loader 以及 boot menu, 並且放在 tftpboot 裡
網路上有 Ubuntu 現在的設定, 就先拿來使用, 之後可以再自己修改
最後記得要修改 txt.cfg, 加上 netboot=nfs nfsroot=xxxx 的設定
接下來就驗收成果, 在 Virtual Box 內做出另一台機器, 網卡記得要有一張在 intnet 內, 介面卡類型建議選成 PCnet-FAST III, 不然可能不會成功

開機順序也可以改一下, 或是在開機時按 F12 進入開機選單


If you have an existing dhcp server, you should point it to your pxe server by doing something like the following
基本的設定了解了之後, 就可以玩很多不同的方案, 其它參考連結
http://anriqing.blogbus.com/logs/74262252.html
https://help.ubuntu.com/community/DisklessUbuntuHowto
http://digitalsanctum.com/2013/03/22/how-to-setup-a-pxe-server-on-ubuntu/
http://www.serenux.com/2010/05/howto-get-an-ubuntu-live-cd-to-boot-off-a-pxe-server/
https://help.ubuntu.com/community/PXEInstallServer
https://help.ubuntu.com/community/PXEInstallMultiDistro
Tftp Server
安裝 Tftp 之後設定檔都不需要修改就可以直接使用, 這個套件是幫助 PXE boot 的過程中把開機檔傳送出去, ex: initrd.gz
$ sudo apt-get -y install tftpd-hpa
DHCP Server
安裝 dhcp server 是為了 PXE boot 過程中可以配置 ip 給 client, 一般就是和 Tftp server 裝在同一台, 但也有方式可以裝在不同台. 另外要注意一個網段內只能有一台 DHCP Server,不然就會打架. 在公司內設定的話, 我是給 Server 兩張網卡, 一張是用 Bridge 接到原來公司的網路, 就可以對外, 另一張用 internal network, 預計是在 intnet 提供 PXE boot 服務, 這樣就不會和公司的 DHCP server 衝突.
第一張網卡用 dhcp 拿到公司的 ip, 第二張我就設定成 192.168.100.1
$ cat /etc/network/interfaces
# This file describes the network interfaces available on your system
# and how to activate them. For more information, see interfaces(5).

# The loopback network interface
auto lo
iface lo inet loopback

# The primary network interface
auto eth0
iface eth0 inet dhcp
iface eth0 inet6 dhcp

auto eth1
iface eth1 inet static
        address 192.168.100.1
        netmask 255.255.255.0
在 Ubuntu 12.04, dhcp3 的名字改成 isc-dhcp-server
$ sudo apt-get -y install isc-dhcp-server
/etc/dhcp/dhcpd.conf 的內容
在 192.168.100.x 的網段提供 100~200, 並且設定開機檔為 "pxelinux.0"
# The ddns-updates-style parameter controls whether or not the server will
# attempt to do a DNS update when a lease is confirmed. We default to the
# behavior of the version 2 packages ('none', since DHCP v2 didn't
# have support for DDNS.)
ddns-update-style none;

# option definitions common to all supported networks...
# option domain-name "example.org";
# option domain-name-servers ns1.example.org, ns2.example.org;

option domain-name "home.local";
option domain-name-servers 192.168.100.1;

default-lease-time 600;
max-lease-time 7200;

# If this DHCP server is the official DHCP server for the local
# network, the authoritative directive should be uncommented.
authoritative;

allow booting;
allow bootp;

subnet 192.168.100.0 netmask 255.255.255.0 {
        range 192.168.100.100 192.168.100.200;
        option routers 192.168.100.1;
        option subnet-mask 255.255.255.0;
        option broadcast-address 192.168.100.255;
        filename "pxelinux.0";
        next-server 192.168.100.1;
}
設定好後記得重開
sudo service isc-dhcp-server restart
如果想要知道有沒有設定成功, 可以先拿一台已經裝好的機器, 加入第二張網卡, 也設定在 intnet, 開機後設定第二張網卡用 dhcp 拿 ip, 如果重啟網路有拿到 ip 就表示沒問題. 也可以看 Server 的 /var/log/syslog
Jul  4 17:26:01 ubuntu dhcpd: DHCPDISCOVER from 08:00:27:47:b0:6e via eth1
Jul  4 17:26:02 ubuntu dhcpd: DHCPOFFER on 192.168.100.100 to 08:00:27:47:b0:6e (PXE-C) via eth1
Jul  4 17:26:02 ubuntu dhcpd: DHCPREQUEST for 192.168.100.100 (192.168.100.1) from 08:00:27:47:b0:6e (PXE-C) via eth1
Jul  4 17:26:02 ubuntu dhcpd: DHCPACK on 192.168.100.100 to 08:00:27:47:b0:6e (PXE-C) via eth1
SYSLINUX
安裝 boot loader
$ sudo apt-get -y install syslinux
NFS
安裝 nfs, 是為了在網路開機成功後, 要抓取其它的檔案使用
在這裡我把 /srv/install 開放給 192.168.100.x 這個網段使用
$ sudo apt-get -y install nfs-kernel-server
$ sudo mkdir /srv/install
$ cat /etc/exports
/srv/install  192.168.100.0/24(ro,async,no_root_squash,no_subtree_check)
$ service nfs-kernel-server restart
# 驗証一下
$ sudo mount 192.168.100.1:/srv/install /mnt
$ sudo umount /mnt
Putting them All Together
準備安裝檔, 假設 Ubuntu 12.04 的光碟已經 mount 在 /mnt/cdrom
$ mkdir -p /srv/install/Ubuntu
$ mkdir -p /srv/install/Ubuntu/12.04
$ mkdir -p /srv/install/Ubuntu/12.04/amd64
$ cd /srv/install/Ubuntu/12.04/amd64
$ cp -R /mnt/cdrom/* .
$ cp -R /mnt/cdrom/.disk .
$ chmod 777 -R /srv/install/Ubuntu
接下來要製作 boot loader 以及 boot menu, 並且放在 tftpboot 裡
網路上有 Ubuntu 現在的設定, 就先拿來使用, 之後可以再自己修改
最後記得要修改 txt.cfg, 加上 netboot=nfs nfsroot=xxxx 的設定
$ cd /var/lib/tftpboot
$ wget http://archive.ubuntu.com/ubuntu/dists/precise/main/installer-amd64/current/images/netboot/netboot.tar.gz
$ tar xzvf netboot.tar.gz
$ head -n 6 /var/lib/tftpboot/ubuntu-installer/amd64/boot-screens/txt.cfg
default install
label install
        menu label ^Install
        menu default
        kernel ubuntu-installer/amd64/linux
        append vga=788 initrd=ubuntu-installer/amd64/initrd.gz netboot=nfs nfsroot=192.168.100.1:/srv/install/Ubuntu/12.04/amd64 -- quiet
PXE boot
接下來就驗收成果, 在 Virtual Box 內做出另一台機器, 網卡記得要有一張在 intnet 內, 介面卡類型建議選成 PCnet-FAST III, 不然可能不會成功

開機順序也可以改一下, 或是在開機時按 F12 進入開機選單


Existing DHCP Server
If you have an existing dhcp server, you should point it to your pxe server by doing something like the following
subnet 192.168.100.0 netmask 255.255.255.0 {
    #other config here
    filename "pxelinux.0";
    next-server
    #pxe host=""
}
基本的設定了解了之後, 就可以玩很多不同的方案, 其它參考連結
http://anriqing.blogbus.com/logs/74262252.html
https://help.ubuntu.com/community/DisklessUbuntuHowto
http://digitalsanctum.com/2013/03/22/how-to-setup-a-pxe-server-on-ubuntu/
http://www.serenux.com/2010/05/howto-get-an-ubuntu-live-cd-to-boot-off-a-pxe-server/
https://help.ubuntu.com/community/PXEInstallServer
3 則留言:
在做cloud builder了嗎?
只是 Study 而已, 快拿履歷來呀~ 我欠奶粉錢!
照著設定,以及參考提供的連結,
測試時, Client電腦,發生如下訊息:
TFTP prefix:
Unable to locate configuration file
重覆檢查多次,
也google好久, 仍是未解.
有何建議嗎?
張貼留言